- Camera may or may not be available but the photo library is
- Video may or may not be available
- We can use the provided picker control without trying to reinvent the wheel because the picker supports different sources (e.g:- Photo Library , Saved Photos or Camera)
- Always check to see if your desired source is available ( even tough you want the camera to provide images for you, you still let the user know the nonavailability of the camera and provide another solution to get images.
How to use the image picker?
In order to use the Image Picker, we need to,
- Create an instance of the UIImagePickerController and set yourself as the delegate for it
- When needed, choose your source type (photo Library, Saved Photos or Camera) and animate the Picker
- Respond to the delegate events for the user either picking an image or cancelling.
Now, my task is to let my app access the photo library in the Simulator, let the user select an image and finally let the image to view in my app.
One of the prerequisite for this app is 'we need to have images in the photo library to let the user select one'. just run your simulator and click on the Photos option (Sunflower icon) to check whether there are images. If not, it will look like below,

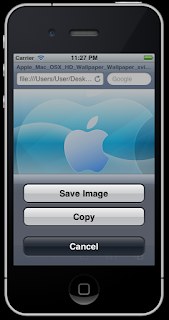
but it's very simple to add images to the photo library. have one or more images in your desktop, drag and drop an image i to the simulator, click and hold the image for a second, when three buttons prompts asking for the task to do , click on Save Image to add the image to the photo library. you can add few more images like this.
Now if you come back and go to the photo library once again, you can save that the added images are there in it.
Now, let's go ahead and make a simple application that uses the image picker.
Create a View based application, add a UIImageView to the entire screen and add a button on top of it. That's all with the design.
Now, you have to start coding with it. keep in mind the steps I showed you on how to work with Image Picker controller.
examine the code in the header file below.
// ImagePickerViewControllerViewController.h
#import <UIKit/UIKit.h>
@interface ImagePickerViewControllerViewController : UIViewController
//you must add this to indicate that we are going to use the delegates of UIPickerController and //UINavigationController
<UIImagePickerControllerDelegate,UINavigationControllerDelegate>
{
UIImagePickerController *ipc;
IBOutlet UIImageView *bgImage;
}
@property (nonatomic,retain) UIImageView *bgImage;
-(IBAction) buttonClicked;
@end
Now, examine the implantation of it as below.
// ImagePickerViewControllerViewController.m
#import "ImagePickerViewControllerViewController.h"
@implementation ImagePickerViewControllerViewController
@synthesize bgImage;
- (void)dealloc
{
[super dealloc];
}
- (void)didReceiveMemoryWarning
{
[super didReceiveMemoryWarning];
}
#pragma mark - View lifecycle
- (void)viewDidUnload
{
[super viewDidUnload];
}
- (BOOL)shouldAutorotateToInterfaceOrientation:(UIInterfaceOrientation)interfaceOrientation
{
return (interfaceOrientation == UIInterfaceOrientationPortrait);
}
//this function will be triggered when the button is clicked
-(IBAction) buttonClicked
{
ipc=[[UIImagePickerController alloc] init]; //we instantiate a UIImagePickerController object
ipc.delegate=self; //we are going to take the control of it
//if the camera is available, let it be the source of the image picker object
if([UIImagePickerController isSourceTypeAvailable:UIImagePickerControllerSourceTypeCamera])
{
ipc.sourceType=UIImagePickerControllerSourceTypeCamera;
}
//if the camera is not available
else
{
//display an alert (message box) saying so
UIAlertView *alert=[[UIAlertView alloc] initWithTitle:@"Information" message:@"Camera Unavailable" delegate:nil cancelButtonTitle:@"OK" otherButtonTitles:nil, nil];
[alert show];
[alert release];
//then let the source be the Photo Library
ipc.sourceType=UIImagePickerControllerSourceTypePhotoLibrary;
}
[self presentModalViewController:ipc animated:YES];
}
//-------------------------the delegate methods of the UIImagePicker controller
//this method talks to the parent control and dismiss the model view controller and release it
- (void)imagePickerControllerDidCancel:(UIImagePickerController *)picker
{
[[picker parentViewController]dismissModalViewControllerAnimated:YES];
[picker release];
}
//we are going to set the image to the background image on our app
- (void)imagePickerController:(UIImagePickerController *)picker didFinishPickingMediaWithInfo:(NSDictionary *)info
{
//set image
bgImage.image=[info objectForKey:UIImagePickerControllerOriginalImage];
//release picker
[[picker parentViewController]dismissModalViewControllerAnimated:YES];
[picker release];}
@end
Following are some of the screen shots of running program.
Now you can build and run your app. I also have made available the project source code for you.

.bmp)


No comments:
Post a Comment