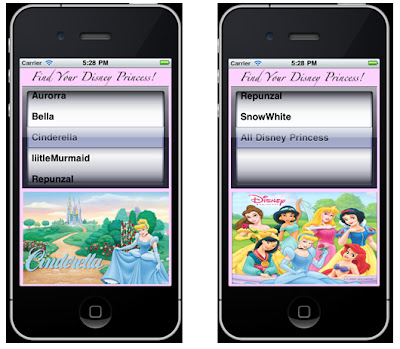
My task is to have a collection of images of Disney Princesses and display their names in a Picker view. Once the user selects a name from the Picker View, the image of the Disney princess will be displayed in the Image View. Again, a quite simple task, right?
Some of the screenshots of the running app are shown below to give you an idea of what I am going to do.
I'll explain you the coding as much as possible. but you have to consider one more thing when dealing with UIPickerView.
you should know what are the UIPicker view data source and delegate. I don't like to explain them to you in this post because you can get a better idea from the IOS Developer Library. follow the below link
to set the datasource and the delegate of your Picker View, select the Picker View-->Click on the Connection Inspector tab --> Under the outlets menu , select datasource button --> drag and drop it on the Files Owner
do the same for the delegate as well.
Now you can use the functions under Picker View Datasource and delegate. Designing the rest is just drag and dropping .
Following is the code of the header file.
// DismeyPickerViewViewController.h
/*
this file declares all the IBOutlets used in the interfcae builder where there is a pickerView to seelct a desired text(name of a disney princess) where below an image viewer displays an image of the princess
note that methods in the UIPickerViewDelegate and UIPickerViewDataSource need not to be declared in this header file but simply implementing in the implementation file is just enough
*/
//all the UI controllers that are used in the interface builder are defined in this packages
#import <UIKit/UIKit.h>
@interface DismeyPickerViewViewController : UIViewController
<UIPickerViewDelegate,UIPickerViewDataSource>
{
NSArray *princess; //Array to hold the images
IBOutlet UIPickerView *pic; //IBOutlets for each UI control we use
IBOutlet UIImageView *img;
}
@property(nonatomic,retain) UIPickerView *pic;
@property(nonatomic,retain) UIImageView *img;
@end
//---------------------------------------------------------------------
Following is the code for the implementation file.
// DismeyPickerViewViewController.m
#import "DismeyPickerViewViewController.h"
@implementation DismeyPickerViewViewController
@synthesize pic;
@synthesize img;
- (void)dealloc
{
[super dealloc];
}
- (void)didReceiveMemoryWarning
{
// Releases the view if it doesn't have a superview.
[super didReceiveMemoryWarning];
// Release any cached data, images, etc that aren't in use.
}
#pragma mark - View lifecycle
/* Implement viewDidLoad to do additional setup after loading the view, typically from a nib.
this methods initializes the princess NSArray that we have declared to store the names of the images that we have in the project folder. note that I am not storing the file extensions. once we reach the end of the array, use nil keyword */
- (void)viewDidLoad
{
princess=[[NSArray alloc] initWithObjects:@"Annika",@"Aurorra",@"Bella",@"Cinderella",@"liitleMurmaid",@"Repunzal",@"SnowWhite",@"All Disney Princess", nil];
[super viewDidLoad];
}
- (void)viewDidUnload
{
[super viewDidUnload];
// Release any retained subviews of the main view.
// e.g. self.myOutlet = nil;
}
- (BOOL)shouldAutorotateToInterfaceOrientation:(UIInterfaceOrientation)interfaceOrientation
{
// Return YES for supported orientations
return (interfaceOrientation == UIInterfaceOrientationPortrait);
}
//-------------methods of UIPickerViewDataSource --------------
// returns the number of 'columns' to display.
//we return one because we have a single diementional array here.
- (NSInteger)numberOfComponentsInPickerView:(UIPickerView *)pickerView
{
return 1;
}
// returns the # of rows in each component..
//arrayName.count returns the number of elements in the array
- (NSInteger)pickerView:(UIPickerView *)pickerView numberOfRowsInComponent:(NSInteger)component
{
return princess.count;
}
//--------------methods of UIPickerViewDelegate ---------------
//this methods sets titles for each row (element) in the array.
//this method will be called iteratively until it assigns titles for all of its elements
- (NSString *)pickerView:(UIPickerView *)pickerView titleForRow:(NSInteger)row forComponent:(NSInteger)component
{
return [princess objectAtIndex:row]; //e.g :- princess[0] ,princess[1]...
}
//this method will be invoked once a user selects an item from the picker view
- (void)pickerView:(UIPickerView *)pickerView didSelectRow:(NSInteger)row inComponent:(NSInteger)component
{
UIImage *newImage; //we need a UIImage object to hold each image
//using the switch block, we decide what name is selected thus what image to view
switch (row) {
case 0:
newImage=[UIImage imageNamed:@"Annika.jpg"];
break;
case 1:
newImage=[UIImage imageNamed:@"Aurorra.jpg"];
break;
case 2:
newImage=[UIImage imageNamed:@"Bella.jpg"];
break;
case 3:
newImage=[UIImage imageNamed:@"Cinderella.jpg"];
break;
case 4:
newImage=[UIImage imageNamed:@"liitleMurmaid.jpg"];
break;
case 5:
newImage=[UIImage imageNamed:@"Repunzal.jpg"];
break;
case 6:
newImage=[UIImage imageNamed:@"SnowWhite.jpg"];
break;
case 7:
newImage=[UIImage imageNamed:@"DisneyPrincess.jpg"];
break;
default:
break;
}
img.image=newImage;
}
@end
//-------------------------------------------------------------------------------------------------------
Now you can build and run your app. I also have made available the project source code for you.


No comments:
Post a Comment