Thursday, January 24, 2013

An MP3 player for blind or visually impaired users : developed in iphone sdk 3.0 using AVFoundationFramework

This was a very tough task since I am new to iphone application development and as for objective c (which is quite a different programming language to me in the beginning). But I took the challenge to develop the Mobile Application Development pair project which is based on an MP3 player for the blind or visually impaired. The task was to develop a general usage application but that can be used by visually impaired wilt sufficient aids to fulfill their requirements as well.

When I first did the literature research on dealing with audio in iphone development, it had several choices to go but I chose AVFoundation Framework which is one of several frameworks that we can use to play and create time-based audiovisual media. It provides an Objective –C interface we use to work on a detailed level with time-based audiovisual data. For an example, we can use it to examine, create and edit media files. We can also get input streams from devices and manipulate video during real-time capture and playback.

Available Screens and how they connect


Basically, this application has improved accessibility for blind or visually impaired users to listen to music/ audio books with guidance of voice prompts. The voice prompt feature has been developed by using the flite-1.4-iphone library. 
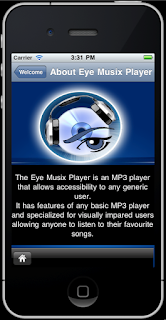
According to what you see in the above screens, each and every tap on any screen helps the user with proper guidance to handle every feature of this application. for an instance, when the user navigates to the music playlist screen and taps (selects) a song, it want play at once since we don't know whether he/ she tapped it purposefully to play that song or tapped on it by mistakenly mainly because they cannot see what they currently select. What EyeMusix player does is, once the user tapps on a song in the list, it reads the song title to the user aloud and if he/she wants to listen to it, the same tap should be done once again. then, the screen navigates to player screen and plays the song.
Like the same, the concept that I've used through out the app is "hear before you confirm"
Now, i'll explain the features implemented in the individual screens


EyeMusic welcome Screen
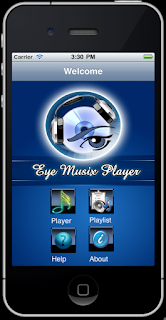

This is the very first screen that appears when you select the EyeMusix icon in the menu of the simulator. It says "welcome to eyeMusix player" to let the user know that they are in the welcome screen now. It basically contains four buttons each does a simple navigation task. But keep in mind that before going to another screen, it always reads aloud what button was clicked and if the user taps the same button for the second time only the navigation to the selected screen works. You also need to notice that there's a lot of space left in this screen without any button but just with a background image with a logo. What if a user taps somewhere on it but not on a button? It will state where the controls are actually located. e.g:- if user taps on the big logo, the prompt says "The buttons are located down..." . That's basically to help new users.


Playlist screen


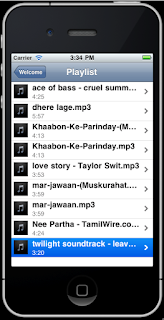
This screen contains table view which displays title of the song, duration and a little icon in each of its cells. Once a user clicks on a song, first the title will be read aloud and a second tap will play the song navigating to the player view.

Player Screen


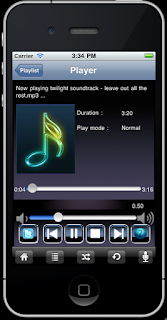
This is the most complicated screen in this app. It basically holds most of the functions that a user expects to do with a song or any audio. For an instance, 
  • play a song,
  • pause now playing song,
  • stop playing a song,
  • play the next song,
  • play the previous song,
  • increase volume
  • decrease volume
  • mute
  • skip forward 
  • rewind 
  • view title of the now playing song
  • view Duration
  • view time leaft
  • view play mode
  • change play mode (shuffle, repeat)
  • switch voice prompt on/off
  • let the user post a tweet(post a little comment on twitter) about the currently playing song [the tiny 
  • button with a twitter icon directs to the twitter screen]


'Tweet about this song' screen


If you listen to a song and what if you really like it or completely hate it? You may tell a friend. To do so, is there another way to share a piece of comment in a social network where all your friends can read your feeling? 
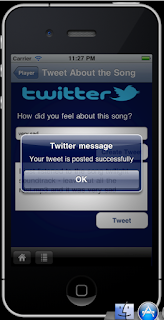

I thought to give the same right to a visually impaired or blind user through this function.  All what he/she has to do is to type just two or three words exactly to mention how they feel about the currently playing song. given the few words of the user, the app generates a simple tweet and makes it a tweet to be posted on his.her twitter wall after confirmation. Interesting, isn't that so? 

About Screen


This is a screen with a simple description about the EyeMusix application. All what the user needs to do is to tap on the screen once to listen to the description as read by the voice prompt. Another tap while reading the description will stop reading.

Help Screen


Actually, this screen is similar to an FAQ page in a website. All what i have done is, list down the possible questions that a user can have while handling this app and give a brief description /answer in a separate page about the selected question. 


I made available the complete project for your reference. 


Friday, January 11, 2013

Creating a simple student's information system in ios using sqlite

I have explained little little applications in ios throughout some previous posts under IOS page in my blog. Now i thought t's time to refresh the beginners knowledge in ios where they can apply all what they've learned so far to make a little database system.

The database that we are going to use in ios apps is sqlite. If you are a beginner, then you may question me,

Why SQLite?

SQLite is a software library that implements a self-contained, serverless, zero-configuration, transactional SQL database engine. SQLite is the most widely deployedSQL database engine in the world. Due to its small size, SQLite is well suited to embedded systems and mobile apps like ios.

if you are using sqlite database in your ios app, you need to add a framework to the project.  follow the steps below to do so

Adding sqlite framwork to an ios project

  1. select your project


2. expand the Link Binary With Libraries menu


3. select libsqlite3.dylib and click Add
 3. you will see that it is added to your project root folder. drag and drop it in the Frameworks folder for better organization


Now, let's focus on the designs. Actually I have made a collection of views to make the app easy to understand.

Below are the screens I have


Main screen ( StudentsDBSystemViewController.xib)

Basically, it has a segmented control which provides access to all other screens. The codes for this are already discussed in the previous posts. You can download the code and refer for clarification.


Registration Screen (RegistrationView.xib)

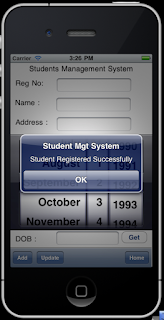
It has few labels and text boxes to enter students basic details. When it comes for a date as date of birth, users may make mistakes in entering it to the system. So that the best is to use a Date Picker control for this and let then select the day,month and the year. Once the date is selected from the picker, user can click on Get  button to get the date to copied to the text box below

if the required data is provided, user can click Add  to insert a record of a new student to the system. can click Update button to update any details or click Home to go back to the main screen.


Search and Update screens (UpdateSearchDelete.xib and Student.xib)

once you select the search button in the main screen, all what you get is a screen which holds a UITableViewController displaying all the available Students IDs in the database. you can select one of it and it redirects you to another screen which displays that particular student's complete details . All except the student ID is changeable  So, if the user wants to make any change in the existing data, he/she can do them and click on Update  button to save in the database. 
Or if the user wishes to remove the student permanently from the system database, it can be done by clicking on Remove button. 
Notice that even this button can be clicked by mistakenly which too lets the students records to be deleted permanently from the database. We should avoid this with a confirmation dialog box.


About Screen (About.xib)

It's just a matter of adding a label and  a text view and display a text that is done via this screen.


I think without explain the source code here, It's better if you can examine the source code and understand it. 
I also made available the project source code for you.

Click to Download


Creating a Twitter application in ios

Twitter is an online social networking service and microblogging service that enables its users to send and read text-based messages of up to 140 characters, known as "tweets". It's quite popular nowadays since people likes to update the world about what they are currently doing, what they found interesting today, how they feel the day and so on as little tweets.

Why I am telling these info to you is that now we are going to discuss an ios app which you can install in your iphone to tweet easily without visiting twitter site. The types of tweets that we are going to use is limited but the way we do that is interesting. 

The following image shows how the design should be done. 

what actually happens here is, we are going to have a Picker view with two columns( user can select two items from each column), that helps to form your tweet saying how are you today and how do you feel about that. So, all what the user has to do is to select them and click on Tweet it! button to post a tweet in his/her twitter page. Simple, but interesting.

once you are done with the design, don't forget to set the UIPickerView data source and delegate to the picker view we have here.
OK, I'll jump to the code now. 


//  InstaTwitViewController.h

#import <UIKit/UIKit.h>

@interface InstaTwitViewController : UIViewController

//we are going to use the UIPickerView datasource and delegate methods

<UIPickerViewDelegate,UIPickerViewDataSource>  
{
    IBOutlet UIPickerView *tweetPicker;  //two objects to hold the controls
    IBOutlet UITextView *notesField;       
    
    NSArray *activities;     //two arrays to hold the two parts of the tweet
    NSArray *feelings;
}
@property(nonatomic,retain)UIPickerView *tweetPicker;
@property(nonatomic,retain)UITextView *notesField;

-(IBAction)sendButtonTapped:(id)sender; //method to sent the tweet
-(IBAction)textFieldDoneEditing:(id)sender;

@end
//---------------------------------------------------------------------------------------------------------

Now, we'll see how these can be implemented.


#import "InstaTwitViewController.h"

@implementation InstaTwitViewController

@synthesize tweetPicker,notesField;

- (void)dealloc
{
    [activities release];
    [feelings release];
    [tweetPicker release];
    [notesField release];
    [super dealloc];
}

- (void)didReceiveMemoryWarning
{  
    [super didReceiveMemoryWarning];
}

#pragma mark - View lifecycle

//this method will be invoked when the app loads for the first time
//we are going to make two NSArrys named activities and feelings and store a collection of related strings
- (void)viewDidLoad
{
activities=[[NSArray alloc]initWithObjects:@"sleeping",@"eating",@"working",@"thinking",@"crying",@"begging",@"leaving",@"shopping",@"hello worlding", nil];

feelings=[[NSArray alloc]initWithObjects:@"awsome",@"sad",@"happy",@"ambivalent",@"nauseous",@"psyched",@"confused",@"hopeful",@"anxious", nil];

    [super viewDidLoad];
}

- (void)viewDidUnload
{
    [super viewDidUnload];
    activities=nil;
    feelings=nil;
    tweetPicker=nil;
    notesField=nil;  
}

- (BOOL)shouldAutorotateToInterfaceOrientation:(UIInterfaceOrientation)interfaceOrientation
{
    return (interfaceOrientation == UIInterfaceOrientationPortrait);
}

//-------------------UIPickerView datasouce methods-----------------------------------------------------
// returns the number of 'columns' to display.
- (NSInteger)numberOfComponentsInPickerView:(UIPickerView *)pickerView
{
    return 2;
}

// returns the # of rows in each component..
-(NSInteger)pickerView:(UIPickerView *)pickerView numberOfRowsInComponent:(NSInteger)component
{

 //we need the number of elements in the activities array to be the number of rows in the first column 
//(here you call it component)

    if(component==0)         
        return [activities count];

//we need the number of elements in the feelings array to be the number of rows in the first column 
    if(component==1)
        return [feelings count];  
}

//-------------------UIPickerView delegate methods-----------------------------------------------------
//to set values for each cell of the UIPickerView
//we use a switch block here to see to which column we are addressing at the moment
//if it is component 0 then have to pass the rowth element of the activities array 
//if component 1, do the same with the feelings array

- (NSString *)pickerView:(UIPickerView *)pickerView titleForRow:(NSInteger)row forComponent:(NSInteger)component
{
    switch (component) 
    {
        case 0:
            return [activities objectAtIndex:row];
            break;
            
        case 1:
            return [feelings objectAtIndex:row];
            break;
            
        default:
            break;
    }
    return nil;
}

//this method will be called if the user selects items from each of the columns of the picker view
-(IBAction)sendButtonTapped:(id)sender
{

//get each comlumn's selction to variables

    NSString *selectedAcivity=[activities objectAtIndex:[tweetPicker selectedRowInComponent:0]];
    NSString *selectedFeeling=[feelings objectAtIndex:[tweetPicker selectedRowInComponent:1]];
    
//format the tweet

 NSString *message=[[NSString alloc]initWithFormat:@"%@ I'm %@ and feeling %@ about it.",notesField.text ? notesField.text :@"",selectedAcivity,selectedFeeling];
  
//display the   
    NSLog(message);
    
  //TWITTER API starts here to pass our message to twitter
  //TWITTER BLACK MAGIC    
  
NSMutableURLRequest *theRequest=[NSMutableURLRequest requestWithURL:[NSURL URLWithString:@"http:yourTwitterUserName.com:yourTwitterPassword@twitter.comstatuses/update.xml"]
                                                            cachePolicy:NSURLRequestUseProtocolCachePolicy
                                                        timeoutInterval:60.0];

    [theRequest setHTTPMethod:@"POST"];

    [theRequest setHTTPBody:[[NSString stringWithFormat:@"status=%@",
                              message] dataUsingEncoding:NSASCIIStringEncoding]];

    NSURLResponse* response;
    NSError* error;
    NSData* result = [NSURLConnection sendSynchronousRequest:theRequest
                                           returningResponse:&response error:&error];

    NSLog(@"%@", [[[NSString alloc] initWithData:result
                                        encoding:NSASCIIStringEncoding] autorelease]);

    // END TWITTER BLACK MAGIC    
    
}

//this method will send the onscreen key board way when clicked on return button in it

-(IBAction)textFieldDoneEditing:(id)sender
{
    [sender becomeFirstResponder];
}

@end
//----------------------------------------------------------------------------------------------------


Now you can build and run your app. I also have made available the project source code for you. 


you can observe the output below. You have to keep one more thing here, if you are using the simulator to test this app, you will see the processing javascripts in the log only. if you test this in a device, your tweets will be posted in your twitter wall


Thursday, January 10, 2013

Creating a simple typing time checker app in ios

This app is going to deal with the time now. Not a big deal but interesting. The target is to let the user type some text and then displaying how much of time consumed to type the word or sentence.

the design is very simple as this.

All what the user needs to do is to click on start button which confirms whether he is ready for the typing or not. If Yes, then he has to type the shown text in the Text box where the time starts counting. once he/she is done with typing, then have to click on the Done button (actually, when the counting starts, Start button's text changes as Done )

OK, shall we start with the code?


Observe the code of header file first,

#import <UIKit/UIKit.h>

@interface timeCheckerViewController : UIViewController

<UIAlertViewDelegate>                  //since we need alert boxes, we need UIAlertViewDelegate
{
    IBOutlet UITextField *sentence;   //text field to enter the text
    IBOutlet UIButton *startButton;   //button to start the typing process
    IBOutlet UILabel *textToType;   //label which displays the text to type
    
    BOOL gameStarted;                  //Boolean variable to check that the game is started or not
    NSTimeInterval startedTime;      //three variables of NSTimeInterval to calculate time
    NSTimeInterval endTime;
    NSTimeInterval timeTaken;
    
}
@property(nonatomic,retain)UITextField *sentence;
@property(nonatomic,assign)BOOL gameStarted;
@property(nonatomic,retain)UIButton *startButton;
@property(nonatomic,retain)UILabel *textToType;

-(IBAction)start:(id)sender;               //function declaration for start button

-(IBAction)exit:(id)sender;                 //function declaration for exit button
-(IBAction)doneTyping:(id)sender;    //function to send the keyboard away

@end

//--------------------------------------------------------------------------------------------------

Now, check the code of the implementation file below


#import "timeCheckerViewController.h"

@implementation timeCheckerViewController

@synthesize sentence,gameStarted,startButton,textToType;

- (void)dealloc
{
    [sentence release];
    [super dealloc];
}

- (void)didReceiveMemoryWarning
{
    [super didReceiveMemoryWarning];
}

#pragma mark - View lifecycle

//this method runs when the view first loads
- (void)viewDidLoad
{
    [super viewDidLoad];           
    gameStarted=NO;                    //when view loaded first, the game is not started
    startButton.titleLabel.text=@"Start";  //so, the text of the button is Start
    sentence.enabled=NO;             //do not enable the text box to type anything yet    
}

- (void)viewDidUnload
{
    [super viewDidUnload];
}

- (BOOL)shouldAutorotateToInterfaceOrientation:(UIInterfaceOrientation)interfaceOrientation
{
    return (interfaceOrientation == UIInterfaceOrientationPortrait);
}

//method implemntation of the start/done  button
-(IBAction)start:(id)sender
{
    if(gameStarted==NO)    //if the game is not yet started
    {

//display this alert asking for the user's permission to start the game

        UIAlertView *alert=[[UIAlertView alloc]initWithTitle:@"Typing Game" message:@"Are you ready to start the game?" delegate:self cancelButtonTitle:@"No" otherButtonTitles:@"YES", nil];
        alert.tag=1;

        [alert show];
    }
    
    //if the game is started

    if(gameStarted==YES) //set the gameStarted as YES (YES is just as TRUE)
    {

//if the user didn't type the gien text exactly, 

        if(sentence.text==@"" || !([[sentence.text lowercaseString] isEqualToString:[textToType.text lowercaseString]]))
        {

//display alert box with error message

            UIAlertView *alert2=[[UIAlertView alloc]initWithTitle:@"Error" message:@"Please type the required text" delegate:self cancelButtonTitle:@"OK" otherButtonTitles:nil, nil];
            
            [alert2 show];

            sentence.text=@""; //clear the text box
        }
        
//if typed correct
        else
        {
//set the gameStarted variable to NO

            gameStarted=NO;

//set the caption of the Done button as Start

            startButton.titleLabel.text=@"Start";

//get the time when clicked the Done button (end time)
            endTime=[NSDate timeIntervalSinceReferenceDate];    

//get the time diffrrence
       
            timeTaken=endTime-startedTime;

//format a proper message

            NSString *message=[[NSString alloc]initWithFormat:@"You typed the word within %.2f seconds!",timeTaken];

//create an alert view with the message
       
            UIAlertView *alert2=[[UIAlertView alloc]initWithTitle:@"Result" message:message delegate:self cancelButtonTitle:@"OK" otherButtonTitles:nil, nil];
        
            [alert2 show];
        }
    }
     
}

//this method shows how I want my alert boxes to be
//it is a delegate method implantation of UIAlertViewDelegate

-(void)alertView:(UIAlertView *)alertView clickedButtonAtIndex:(NSInteger)buttonIndex
{
    if(alertView.tag==1)
    {
    
        if(buttonIndex==1)
        {
            if(gameStarted==NO)
            {
                sentence.text=@"";
                gameStarted=YES;
                sentence.enabled=YES;
                startButton.titleLabel.text=@"Done";
                startedTime=[NSDate timeIntervalSinceReferenceDate];   
            }
        }
    }
    
    if(alertView.tag==2)
    {
        if(buttonIndex==1)
        {
            gameStarted=NO;
            exit(0); 
        }
    }
}

//when user clicks on exit button, this function will be called
//it displays an alert box to conform the exit

-(IBAction)exit:(id)sender
{
    UIAlertView *alert=[[UIAlertView alloc]initWithTitle:@"Confirmation" message:@"Are you sure you want to exit from the game?" delegate:self cancelButtonTitle:@"NO" otherButtonTitles:@"YES", nil];
    alert.tag=2;
    [alert show];
        
}

//if the user is done typing,he can send the on screen keyboard away

-(IBAction)doneTyping:(id)sender
{
    [sender becomeFirstResponder];
}

@end


Now you can build and run your app. I also have made available the project source code for you. 


Some screenshots of the output


Creating a simple ios app with the Date Picker to find what day is it

From the above heading, you might think how stupid it is to make an app to find out the date without checking out the calendar :p It's not what I really mean here. 

I am going to use the UIDatePicker controller to let the user select a preferred date from it and check out what day of the week it is e.g:- if you select your birthday, it should tell you on what day of the week you are born. Interesting, isn't it. It's also simple because it's not even complex as using datasources and delegates as we did discuss in the UIPickerView post.

The design is simple as always, you will understand it from the below diagram

 you have a Date Picker added to your screen. Make sure to select it -->  go to Attributes inspector and select the Mode to Date to let  the user select the day, month and the year only.

You need to have one more button to let the user click after selecting a date.

All the rest are the icing for the app screen :)


now examine the code of the header file below

//  MyDatePickerAppViewController.h

#import <UIKit/UIKit.h>

@interface MyDatePickerAppViewController : UIViewController {
    
    IBOutlet UIDatePicker *dp;        // an object of UIDatePicker to deal with its functions
       
}

@property(nonatomic,retain) UIDatePicker *dp;

-(IBAction) displayDay;                //a method for the button click

@end
//-------------------------------------------------------------------------------------------------------


Next, let's move to the implementation file


//  MyDatePickerAppViewController.m

#import "MyDatePickerAppViewController.h"

@implementation MyDatePickerAppViewController

- (void)dealloc
{
    [super dealloc];
}

- (void)didReceiveMemoryWarning
{
    [super didReceiveMemoryWarning];
}

#pragma mark - View lifecycle

- (void)viewDidUnload
{
    [super viewDidUnload];
}

- (BOOL)shouldAutorotateToInterfaceOrientation:(UIInterfaceOrientation)interfaceOrientation
{
    return (interfaceOrientation == UIInterfaceOrientationPortrait);
}

@synthesize dp;

-(IBAction) displayDay
{
    NSDate *chosen=dp.date;              //datepicker.date gives the selected date which is an NSDate object
    
    NSDateFormatter *formatter=[[NSDateFormatter alloc] init];  //creating an NSDateFormatter object
    
    [formatter setDateFormat:@"EEEE"];                        //we are going to format the date in IEEE standard
    
//find the chosen day's day in the week and get it to a string
    NSString *weekDay=[formatter stringFromDate:chosen]; 
    
//format a message
    NSString *msg=[[NSString alloc] initWithFormat:@"The day is %@",weekDay];
    
//view the message in an alert box
    UIAlertView *alert=[[UIAlertView alloc] initWithTitle:@"What day is it?" message:msg delegate:nil cancelButtonTitle:@"Okay" otherButtonTitles:nil, nil];
    
    [alert show];
   
    [alert release];
    [msg release];
    [formatter release];    
}

@end

Output of the app is as following

Now you can build and run your app. I also have made available the project source code for you. 


Working with images and the camera in ios

If we are wanting to work with the images and the camera there are some approaches available for us in iphone. We have to let the user select a bunch of images in any of this scenarios

  • Camera may or may not be available but the photo library is
  • Video may or may not be available
  • We can use the provided picker control without trying to reinvent the wheel because the picker supports different sources  (e.g:- Photo Library , Saved Photos or Camera)
  • Always check to see if your desired source is available ( even tough you want the camera to provide images for you, you still let the user know the nonavailability of the camera and provide another solution to get images.

How to use the image picker?


In order to use the Image Picker, we need to,
  • Create an instance of the UIImagePickerController and set yourself as the delegate for it
  • When needed, choose your source type (photo Library, Saved Photos or Camera) and animate the Picker
  • Respond to the delegate events for the user either picking an image or cancelling.
Now, my task is to let my app access the photo library in the Simulator, let the user select an image and finally let the image to view in my app.

One of the prerequisite for this app is 'we need to have images in the photo library to let the user select one'. just run your simulator and click on the Photos option (Sunflower icon) to check whether there are images. If not, it will look like below,


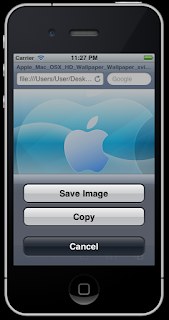
but it's very simple to add images to the photo library. have one or more images in your desktop, drag and drop an image i to the simulator, click and hold the image for a second, when three buttons prompts asking for the task to do , click on Save Image to add the image to the photo library. you can add few more images like this. 

Now if you come back and go to the photo library once again, you can save that the added images are there in it.


Now, let's go ahead and make a simple application that uses the image picker. 
Create a View based application, add a UIImageView to the entire screen and add a button on top of it. That's all with the design.

Now, you have to start coding with it. keep in mind the steps I showed you on how to work with Image Picker controller.

examine the code in the header file below.


//  ImagePickerViewControllerViewController.h

#import <UIKit/UIKit.h>

@interface ImagePickerViewControllerViewController : UIViewController 

//you must add this to indicate that we are going to use the delegates of UIPickerController and //UINavigationController
<UIImagePickerControllerDelegate,UINavigationControllerDelegate>   
{
    UIImagePickerController *ipc;
    IBOutlet UIImageView *bgImage;
}

@property (nonatomic,retain) UIImageView *bgImage;

-(IBAction) buttonClicked;

@end

Now, examine the implantation of it as below.


//  ImagePickerViewControllerViewController.m

#import "ImagePickerViewControllerViewController.h"

@implementation ImagePickerViewControllerViewController

@synthesize bgImage;

- (void)dealloc
{
    [super dealloc];
}

- (void)didReceiveMemoryWarning
{
    [super didReceiveMemoryWarning];
}

#pragma mark - View lifecycle

- (void)viewDidUnload
{
    [super viewDidUnload];
}

- (BOOL)shouldAutorotateToInterfaceOrientation:(UIInterfaceOrientation)interfaceOrientation
{
    return (interfaceOrientation == UIInterfaceOrientationPortrait);
}

//this function will be triggered when the button is clicked
-(IBAction) buttonClicked
{
    ipc=[[UIImagePickerController alloc] init];   //we instantiate a UIImagePickerController object
    ipc.delegate=self;                                         //we are going to take the control of it
    
//if the camera is available, let it be the source of the image picker object

    if([UIImagePickerController isSourceTypeAvailable:UIImagePickerControllerSourceTypeCamera])
    {
        ipc.sourceType=UIImagePickerControllerSourceTypeCamera;             
    }
    
//if the camera is not available

    else
    {
        //display an alert (message box) saying so

        UIAlertView *alert=[[UIAlertView  alloc] initWithTitle:@"Information" message:@"Camera Unavailable" delegate:nil cancelButtonTitle:@"OK" otherButtonTitles:nil, nil];
        
        [alert show];
        [alert release];

//then let the source be the Photo Library

        ipc.sourceType=UIImagePickerControllerSourceTypePhotoLibrary;
    }
    
    [self presentModalViewController:ipc animated:YES];
}

//-------------------------the delegate methods of the UIImagePicker controller
//this method talks to the parent control and dismiss the model view controller and release it
- (void)imagePickerControllerDidCancel:(UIImagePickerController *)picker
{
    [[picker parentViewController]dismissModalViewControllerAnimated:YES];
    [picker release];
}

//we are going to set the image to the background image on our app
- (void)imagePickerController:(UIImagePickerController *)picker didFinishPickingMediaWithInfo:(NSDictionary *)info
{
    //set image
    bgImage.image=[info objectForKey:UIImagePickerControllerOriginalImage];
    
    //release picker
    [[picker parentViewController]dismissModalViewControllerAnimated:YES];
    [picker release];}

@end

Following are some of the screen shots of running program.

Now you can build and run your app. I also have made available the project source code for you. 


A simple ios app with Picker View and Image View

This app describes some important but basic tips in ios app development. They are the usage of a Picker View, Image View and how to work with an NSArray (it's just an array that can hold any type of data )

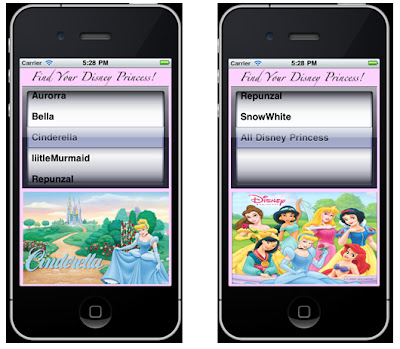
My task is to have a collection of images of Disney Princesses and display their names in a Picker view. Once the user selects a name from the Picker View, the image of the Disney princess will be displayed in the Image View. Again, a quite simple task, right? 

Some of the screenshots of the running app are shown below to give you an idea of what I am going to do.


I'll explain you the coding as much as possible. but you have to consider one more thing when dealing with UIPickerView.

you should know what are the UIPicker view data source and delegate. I don't like to explain them to you in this post because you can get a better idea from the IOS Developer Library. follow the below link

UIPickerView Class Reference

to set the datasource and the delegate of your Picker View, select the Picker View-->Click on the Connection Inspector tab --> Under the outlets menu , select datasource button --> drag and drop it on the Files Owner 


do the same for the delegate as well.

Now you can use the functions under Picker View Datasource and delegate. Designing the rest is just drag and dropping .

Following is the code of the header file. 


//  DismeyPickerViewViewController.h
/*
 this file declares all the IBOutlets used in the interfcae builder where there is a pickerView to seelct a desired text(name of a disney princess) where below an image viewer displays an image of the princess
 note that methods in the UIPickerViewDelegate and UIPickerViewDataSource need not to be declared in this header file but simply implementing in the implementation file is just enough
 */

//all the UI controllers that are used in the interface builder are defined in this packages

#import <UIKit/UIKit.h>

@interface DismeyPickerViewViewController : UIViewController 

<UIPickerViewDelegate,UIPickerViewDataSource>
{
    NSArray *princess;                              //Array to hold the images
    IBOutlet UIPickerView *pic;                //IBOutlets for each UI control we use
    IBOutlet UIImageView *img;
    
}

@property(nonatomic,retain) UIPickerView *pic;
@property(nonatomic,retain) UIImageView *img;

@end

//---------------------------------------------------------------------


Following is the code for the implementation file. 

//  DismeyPickerViewViewController.m

#import "DismeyPickerViewViewController.h"

@implementation DismeyPickerViewViewController

@synthesize pic;
@synthesize img;

- (void)dealloc
{
    [super dealloc];
}

- (void)didReceiveMemoryWarning
{
    // Releases the view if it doesn't have a superview.
    [super didReceiveMemoryWarning];
    
    // Release any cached data, images, etc that aren't in use.
}

#pragma mark - View lifecycle

/* Implement viewDidLoad to do additional setup after loading the view, typically from a nib.
this methods initializes the princess NSArray that we have declared to store the names of the images that we have in the project folder. note that I am not storing the file extensions. once we reach the end of the array, use nil keyword */
- (void)viewDidLoad
{

  princess=[[NSArray alloc] initWithObjects:@"Annika",@"Aurorra",@"Bella",@"Cinderella",@"liitleMurmaid",@"Repunzal",@"SnowWhite",@"All Disney Princess", nil];
    
    [super viewDidLoad];
}

- (void)viewDidUnload
{
    [super viewDidUnload];
    // Release any retained subviews of the main view.
    // e.g. self.myOutlet = nil;
}

- (BOOL)shouldAutorotateToInterfaceOrientation:(UIInterfaceOrientation)interfaceOrientation
{
    // Return YES for supported orientations
    return (interfaceOrientation == UIInterfaceOrientationPortrait);
}

//-------------methods of UIPickerViewDataSource --------------

// returns the number of 'columns' to display.
//we return one because we have a single diementional array here.
- (NSInteger)numberOfComponentsInPickerView:(UIPickerView *)pickerView
{
    return 1;
}

// returns the # of rows in each component..
//arrayName.count returns the number of elements in the array
- (NSInteger)pickerView:(UIPickerView *)pickerView numberOfRowsInComponent:(NSInteger)component
{
    return princess.count;
}

//--------------methods of UIPickerViewDelegate ---------------

//this methods sets titles for each row (element) in the array.
//this method will be called iteratively until it assigns titles for all of its elements
- (NSString *)pickerView:(UIPickerView *)pickerView titleForRow:(NSInteger)row forComponent:(NSInteger)component
{
    return [princess objectAtIndex:row];    //e.g :- princess[0] ,princess[1]...
    
}

//this method will be invoked once a user selects an item from the picker view
- (void)pickerView:(UIPickerView *)pickerView didSelectRow:(NSInteger)row inComponent:(NSInteger)component
{
    UIImage *newImage;               //we need a UIImage object to hold each image
    
//using the switch block, we decide what name is selected thus what image to view
    switch (row) {
        case 0:
            newImage=[UIImage imageNamed:@"Annika.jpg"];
            break;
            
        case 1:
            newImage=[UIImage imageNamed:@"Aurorra.jpg"];
            break; 
            
        case 2:
            newImage=[UIImage imageNamed:@"Bella.jpg"];
            break;
            
        case 3:
            newImage=[UIImage imageNamed:@"Cinderella.jpg"];
            break;
            
        case 4:
            newImage=[UIImage imageNamed:@"liitleMurmaid.jpg"];
            break;
               
        case 5:
            newImage=[UIImage imageNamed:@"Repunzal.jpg"];
            break;
            
        case 6:
            newImage=[UIImage imageNamed:@"SnowWhite.jpg"];
            break;
            
        case 7:
            newImage=[UIImage imageNamed:@"DisneyPrincess.jpg"];
            break;
                       
        default:
            break;
    }    
    img.image=newImage;
}

@end

//-------------------------------------------------------------------------------------------------------

Now you can build and run your app. I also have made available the project source code for you. 

Click to Download