
I write this series of posts in order to explain you how I followed some steps to overcome the problem I faced because of running out of disk space in my fedora 14 virtual machine. So far I have explained how I could defragment the virtual hard disk and compact the virtual hard disk to obtain some space from the unused space. If you require further details, please refer the posts in advance but it doesn't mean that you must follow those steps in order to add some more space to your virtual hard disk to expand the size of it. As I have already mentioned, the tasks that I performed are independent from each other.
Before expanding your VM disk size, please note that even though this provides steps to increase the size of your virtual disk, the size of the disk partition does not increase as observed inside the guest operating system. You must follow steps related to your specific operating system to increase the size of the disk partition or partitions. Don't worry, I'll be explaining how I achieved that task through a very useful tool called GParted in one of my future posts.
I recommend you that always before you meddle with your disks, partitions, memory related activities, please have a backup of your virtual machine. What I mean here as a 'backup' is a Full Clone of your virtual machine. I don't recommend having just a copy of your virtual machine folder in some other location in your computer.
Whatever the version of VMWare you are using, confirm the following before increasing the size of the virtual disk.
- Check whether you have existing snapshots of your virtual machine. if so, remove all of them
- Make sure your virtual machine is powered off.
Steps that should be followed in VMWare Workstation 7.1.4
- Power off the virtual machine if it is already running
- select the proper tab of your virtual machine from the VMWare Home screen

3. Select VM tab from the top and select Settings
.bmp)
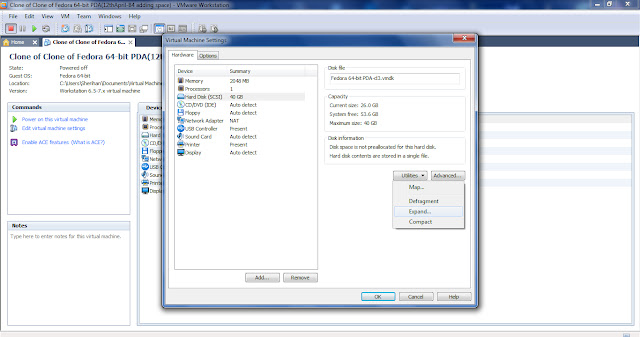
4. Under Hardware tab, click on Hard Disk (SCSI) and select Expand from the Utilities drop down list.
.bmp)
5.Enter the new size that you want to allocate as more space to your disk and then click Expand.
.bmp)
.bmp)
It would take some time
to complete the disk expanding task. When it completes, it will display a
success message. You can also notice that the new size of your virtual machine disk has changed to the value that you provided.
if you came this far to solve the 'low disk space' in your virtual machine, even now you will notice your problem has not solved yet. What actually happens here is that VMWare has just added some space to your virtual disk as you requested but it will just remain as unallocated space in your virtual disk without actually adding them to your disk partition or partitions.
The next challenge is how we are going to add this 'added but unallocated space' to our virtual machine disk partition to make use of it.
See you with the solution in the next post :)
Next post is the important one I think.
ReplyDeleteYes Hishan. It was the most important one. lack of resources..that's wot I thought to post one
Delete