Saturday, August 17, 2013

An Image processing application in IOS


Hello all , I thought to write an interesting post in IOS this time. It’s going to be a colorful application J No suspense…All what I’m going to explain here is about an image processing application in IOS. We all know what image processing means. Image processing is any form of signal processing for which the input is an image, such as a photograph or a set of characteristics or parameters related to the image.

I have been working on finding techniques to perform few takes with an image that is been selected from a UIImagePickerController . So, what I’m going to explain here describes the below tasks which I have already figured out how to achieve.
  • How to pop up the UIImagePickerController in an iphone to select an image
  • How to convert a UIImage to Grayscale
  • How to convert a UIImage to Black and White
  • How to resize a UIImage
  • How to check whether a UIImage is black and white or not

  • How to convert an image to Hexadecimal string

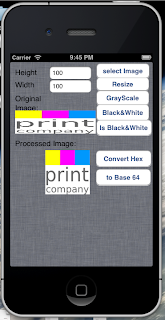
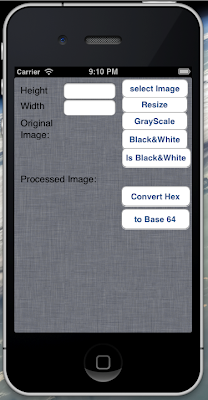
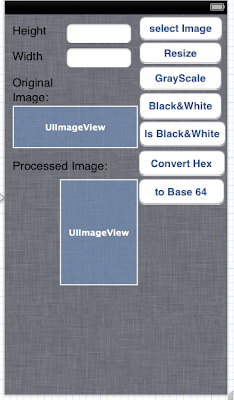
The application that I designed consists of a single view with two UIImageViews, each to display the image before processing and after processing. And I have a collection of buttons where each one will perform the image process and display the resulting image in the second UIImageView.

Following is the simple screen that I have created to perform all the above mentioned tasks. And please make sure that you have enough photos in you device or simulator’s photo library to test the functions correctly working. I recommend having images with different file extensions (.bmp, jpeg, png etc), sizes and colors.

#import <UIKit/UIKit.h>
@interface ViewController : UIViewController
<UIApplicationDelegate,UIImagePickerControllerDelegate,UINavigationControllerDelegate,UIPopoverControllerDelegate>
{
    IBOutlet UITextField *getHeight;
    IBOutlet UITextField *getWidth;
    IBOutlet UIImageView *imageDisplay;
    IBOutlet UIImageView *resultImageView;
    IBOutlet UIButton *resizeImageBtn;
    IBOutlet UIButton *convertGrayScaleBtn;
    IBOutlet UIButton *convertBlackNWhiteBtn;
    IBOutlet UIButton *convertMonoChromeBtn;
    IBOutlet UIButton *selectImageBtn;
    IBOutlet UIButton *convertToHex;
    IBOutlet UIButton *convertToBase64;
    UIImagePickerController *ipc;
    UIPopoverController *popoverController;
    UIImage *sourceImage;
    UIAlertView *alert;
}

@property (nonatomic,retain)UITextField *getHeight;
@property (nonatomic,retain)UITextField *getWidth;
@property (nonatomic,retain)UIImageView *imageDisplay;
@property (nonatomic,retain)UIImageView *resultImageView;
@property (nonatomic,retain)UIButton *resizeImageBtn;
@property (nonatomic,retain)UIButton *convertGrayScaleBtn;
@property (nonatomic,retain)UIButton *convertBlackNWhiteBtn;
@property (nonatomic,retain)UIButton *convertMonoChromeBtn;
@property (nonatomic,retain)UIButton *selectImageBtn;
@property (nonatomic,retain)UIButton *convertToHex;
@property (nonatomic,retain)UIButton *convertToBase64;
@property (nonatomic, retain) UIPopoverController *popoverController;
@property (nonatomic, retain) UIImagePickerController *ipc;
@property (nonatomic, retain) UIImage *sourceImage;
@property (nonatomic, retain) UIAlertView *alert;

-(IBAction) resize:(id)sender;
-(IBAction) convertGrayScale:(id)sender;
-(IBAction) convertBlackNWhite:(id)sender;
-(IBAction) checkBlackAndWhite:(id)sender;
-(IBAction) selectImage:(id)sender;
-(IBAction) convertImageToHex:(id)sender;
-(IBAction) convertToBaseSixtyFour:(id)sender;

@end

and do not forget to put the below section in your implementation file. 

@synthesize getHeight,getWidth,imageDisplay,resizeImageBtn,convertBlackNWhiteBtn,convertGrayScaleBtn,convertMonoChromeBtn,resultImageView,popoverController,ipc,sourceImage,selectImageBtn,alert,convertToHex,convertToBase64;

By the way, do you know how to add images to the photo library in a simulator?
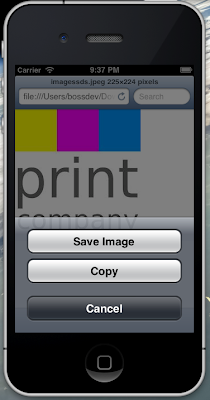
It’s very simple. Keep few images in a folder and run the ios simulator in a side of the screen. You can be in any screen in the simulator. Drag and drop the images that you have (one at a time) on to the simulator’s screen. The image will be displayed on the screen. Click and hold the , mouse on the image for about a second where a popup will ask you whether you need to save the image. Select “Save Image” option where the selected image will be made available in your Photo Library from that point onwards.

I don’t think that I should explain you on how to create a view based an xcode project and create an interface as simple as above. If not sure, you can refer my previous blogs under the ios category. OK, following is my header file content. By the name means of the variables, it’s easy for you to understand what they are used for.

So, do not forget to bind the controls (the UIButtons and UIImageViews) with their declared variables and methods. I hope you can simply do that. Ok, let’s start the work now. For making the post simple for you to refer, I have made it a collection of posts, so, all what you have to do is simply click on the above links to know about the implementation of the task that you want to achieve.

How to convert an image to Hexadecimal string?

Please do follow this post along with the post here

Recently I had to face a problem in sending a user selected image in an ios application, to a printer where the printer only identifies hex strings. After days of struggle, finally I came up with a solution by following an existing algorithm in some other language to do the same task in my ios application.

If someone faced the same situation as me, don't worry even to copy my code and proceed with your work without being stuck for few days :)

-(IBAction) convertImageToHex:(id)sender
{
    UIImage *srcImg=[imageDisplay image];//imageDisplay is the UIImageView that I currently display the user selected image from the Photo Library
    NSString *hexOutput=[self convertUIImageToHex:srcImg];
    NSLog(@"%@",hexOutput);
}

//this function will accept a UIImage and convert it to the Hexa Decimal String
-(NSString *)convertUIImageToHex:(UIImage *)uiImage
{
    NSMutableString *writeString=[[NSMutableString alloc]init];
    NSMutableString *trimmedString=[[NSMutableString alloc]init];
    // First get the image into your data buffer
    CGImageRef imageRef = [uiImage CGImage];
    NSUInteger width = CGImageGetWidth(imageRef);
    NSUInteger height = CGImageGetHeight(imageRef);
    CGColorSpaceRef colorSpace = CGColorSpaceCreateDeviceRGB();
    unsigned char *rawData = (unsigned char*) calloc(height * width * 4, sizeof(unsigned char));
    NSUInteger bytesPerPixel = 4;
    NSUInteger bytesPerRow = bytesPerPixel * width;
    NSUInteger bitsPerComponent = 8;
    CGContextRef context = CGBitmapContextCreate(rawData, width, height,
                                                 bitsPerComponent, bytesPerRow, colorSpace,
                                                 kCGImageAlphaPremultipliedLast | kCGBitmapByteOrder32Big);
    CGColorSpaceRelease(colorSpace);

    CGContextDrawImage(context, CGRectMake(0, 0, width, height), imageRef);
    CGContextRelease(context);

    NSUInteger xOfImage;
    NSUInteger yOfImage;

    int wp=0;

    @try
    {
        for(xOfImage=0;xOfImage <= width-1 ; xOfImage++)
        {
            for(yOfImage=0;yOfImage<=height-1;yOfImage++)
            {
                int byteIndex = (bytesPerRow * yOfImage) + xOfImage * bytesPerPixel;
                
                char green = rawData[byteIndex + 1];

                byteIndex += 4;
                
                if ((yOfImage % 8) == 0)
                {
                    wp = 0;
                    wp = (green!=0) ? 0 : 1;
                }
                else if ((yOfImage % 8) == 7)
                {
                    wp = (wp << 1) | ((green!=0) ? 0 : 1);
                    [writeString appendString:[NSMutableString stringWithFormat:@"%%%02X",wp]];  
                }
                else
                {
                    wp = (wp << 1) | ((green!=0) ? 0 : 1);
                }    
            }      
        }
    }
    
    @catch (NSException *exception)
    {
        NSLog(@"%@",exception);      
    }
    @finally
    {
        NSString *formattedString=[[[NSString alloc]initWithFormat:@"%@",writeString] lowercaseString]    
        return formattedString;
    }

}


Ok, now let's say we Input a UIImage and successfully converted it to Hex string... As I have done above, It will simply display the output in the NSLog. But, how do you know that your output is correct?

Yes, It was a bit problem to me too. But as I said above, I used an existing hexconverison algorithm in some other language and I had the converted hex string of a specific image saved in a text file via that program. So, what I did was, downloaded a simple bitmap image from the web and let that program convert te image to hex. then i got a copy of the resulting hex string value stored text file-->1

then I came back to my IOS application, added the same bitmap image to my photo library and let my app convert it to hex as well. Since the output is in the Log, I copied it to another text file and had it with me -->2

finally what I did was, comparing both of the files that they are identical. Of Course they were identical?

Ok, now you would ask, how I compared them? going through line by line? :) of course NO

you can get this tool called DiffMerge from the following link. It helps you with that process...


How to check whether a UIImage is black and white or not?


Please do follow this post along with the post here

In one of my previous posts, I described on how I convert an image to black and white and grayscale as well. Here, I'm going to explain on how to check an image is black and white or not.

//checking whether the image is a black and white one or not
-(IBAction) checkBlackAndWhite:(id)sender
{
//sourceImage  is the user selected image from the Image Picker. I simply display it on a UIImageView and for the processing  i get the image that is currently viewed in the UIImageView
    BOOL blackNWhite=[self imageIsBlackAndWhite:sourceImage];
    
    if(sourceImage==nil)
    {
        NSLog(@"Image Not selected");
        
        alert=[[UIAlertView alloc] initWithTitle:@"Image Process" message:@"Image Not selected" delegate:nil cancelButtonTitle:@"Cancel" otherButtonTitles:@"OK", nil];
        [alert show];
    }
    
    else
    {    
        if(blackNWhite==YES)
        {
            NSLog(@"Image is Black and White");
            
            alert=[[UIAlertView alloc] initWithTitle:@"Image Process" message:@"Image is Black and White" delegate:nil cancelButtonTitle:@"Cancel" otherButtonTitles:@"OK", nil];
            [alert show];
        }
        
        else
        {
            NSLog(@"Image is not Black and White");
            
            alert=[[UIAlertView alloc] initWithTitle:@"Image Process" message:@"Image is not Black and White" delegate:nil cancelButtonTitle:@"Cancel" otherButtonTitles:@"OK", nil];
            [alert show];
        }
    }
}

//method will check whther a selected image is a black and white image or not
-(BOOL)imageIsBlackAndWhite:(UIImage *)image
{
    BOOL isBlackNWhite=NO;

    // load image
    CGImageRef imageRef = image.CGImage;
    CFDataRef cfData = CGDataProviderCopyData(CGImageGetDataProvider(imageRef));
    NSData * data = (__bridge NSData *) cfData;
    char *pixels = (char *)[data bytes];
    
    const int threshold = 10; //define a gray threshold
    
    for(int i = 0; i < [data length]; i += 4)
    {
        Byte red = pixels[i];
        Byte green = pixels[i+1];
        Byte blue = pixels[i+2];
        
        //check if a single channel is too far from the average value.
        //greys have RGB values very close to each other
        int average = (red+green+blue)/3;
        
        if( abs(average - red) >= threshold ||abs(average - green) >= threshold ||abs(average - blue) >= threshold )
        { 
            isBlackNWhite=NO;
        }
        
        else
        {
            isBlackNWhite=YES;
        }
    }
    CFRelease(cfData);
    return isBlackNWhite;
}


How to convert a UIImage to Black and White?


Please do follow this post along with the post here

//this button click even twill call the convertToBlackNWhite() method to sart the color conversion to black and white
 -(IBAction) convertBlackNWhite:(id)sender

{    
    if(sourceImage==nil) //sourceImage  is the user selected image from the Image Picker. I simply display it on a UIImageView and for the processing  i get the image that is currently viewed in the UIImageView
    {
        NSLog(@"Image Not selected");
    }
    
    else
    {    
        UIImage *blackAndWhiteImage=[self convertToBlackNWhite:sourceImage];
        resultImageView.image=blackAndWhiteImage;
    }
}

//method is used to convert an image to its black and white image and view in the UIImageView on te screen
-(UIImage *)convertToBlackNWhite:(UIImage *)initialImage

{
    /*
     approach:- threshold
     get the UIImage and convert it to take the bitmap image of it.
     check each pixal whether it is higher than a certain value. if yes->make it white else black
     */
    unsigned char *bitmap = [self convertUIImageToBitmapRGBA8:initialImage];
    
    for (int i=0;i<initialImage.size.width * initialImage.size.height * 4; i+=4)
    {
        if ((bitmap[i] + bitmap[i + 1] + bitmap[i + 2]) < (255 * 3 / 2))
        {
            bitmap[i ] = 0;
            bitmap[i + 1] = 0;
            bitmap[i + 2] = 0;
        }
        else
        {
            bitmap[i ] = 255;
            bitmap[i + 1] = 255;
            bitmap[i + 2] = 255;
        }
    }
    
    initialImage = [self convertBitmapRGBA8ToUIImage:bitmap withWidth:initialImage.size.width withHeight:initialImage.size.height];
    
    return initialImage;
    
}

//PLEASE FIND THE BELOW CONVERSION METHODS FROM HERE
//https://gist.github.com/PaulSolt/739132

-(UIImage *) convertBitmapRGBA8ToUIImage:(unsigned char *) buffer withWidth:(int) width withHeight:(int) height
{
size_t bufferLength = width * height * 4;
CGDataProviderRef provider = CGDataProviderCreateWithData(NULL, buffer, bufferLength, NULL);
size_t bitsPerComponent = 8;
size_t bitsPerPixel = 32;
size_t bytesPerRow = 4 * width;
    
CGColorSpaceRef colorSpaceRef = CGColorSpaceCreateDeviceRGB();
    
if(colorSpaceRef == NULL)
    {
NSLog(@"Error allocating color space");
CGDataProviderRelease(provider);
return nil;
}
    
CGBitmapInfo bitmapInfo = kCGBitmapByteOrderDefault | kCGImageAlphaPremultipliedLast;
CGColorRenderingIntent renderingIntent = kCGRenderingIntentDefault;
    
CGImageRef iref = CGImageCreate(width,
height,
bitsPerComponent,
bitsPerPixel,
bytesPerRow,
colorSpaceRef,
bitmapInfo,
provider, // data provider
NULL, // decode
YES, // should interpolate
renderingIntent);
    
uint32_t* pixels = (uint32_t*)malloc(bufferLength);
    
if(pixels == NULL)
    {
NSLog(@"Error: Memory not allocated for bitmap");
CGDataProviderRelease(provider);
CGColorSpaceRelease(colorSpaceRef);
CGImageRelease(iref);
return nil;
}
    
CGContextRef context = CGBitmapContextCreate(pixels, width, height, bitsPerComponent, bytesPerRow, colorSpaceRef, bitmapInfo);
if(context == NULL)
    {
NSLog(@"Error context not created");
free(pixels);
}
    
UIImage *image = nil;
    
if(context)
    {        
CGContextDrawImage(context, CGRectMake(0.0f, 0.0f, width, height), iref);        
CGImageRef imageRef = CGBitmapContextCreateImage(context);
        
// Support both iPad 3.2 and iPhone 4 Retina displays with the correct scale
if([UIImage respondsToSelector:@selector(imageWithCGImage:scale:orientation:)]) {
float scale = [[UIScreen mainScreen] scale];
image = [UIImage imageWithCGImage:imageRef scale:scale orientation:UIImageOrientationUp];

               else 
                {
image = [UIImage imageWithCGImage:imageRef];
}
        
CGImageRelease(imageRef);
CGContextRelease(context);
}
    
CGColorSpaceRelease(colorSpaceRef);
CGImageRelease(iref);
CGDataProviderRelease(provider);
    
if(pixels) {
free(pixels);
}
    
return image;
}

-(unsigned char *) convertUIImageToBitmapRGBA8:(UIImage *) image
{
CGImageRef imageRef = image.CGImage;
    
//Create a bitmap context to draw the uiimage into
CGContextRef context = [self newBitmapRGBA8ContextFromImage:imageRef];
    
if(!context)
    {
return NULL;
}
    
size_t width = CGImageGetWidth(imageRef);
size_t height = CGImageGetHeight(imageRef);
    
CGRect rect = CGRectMake(0, 0, width, height);
    
// Draw image into the context to get the raw image data
CGContextDrawImage(context, rect, imageRef);
    
// Get a pointer to the data
unsigned char *bitmapData = (unsigned char *)CGBitmapContextGetData(context);
    
// Copy the data and release the memory (return memory allocated with new)
size_t bytesPerRow = CGBitmapContextGetBytesPerRow(context);
size_t bufferLength = bytesPerRow * height;
    
unsigned char *newBitmap = NULL;
    
if(bitmapData)
    {
newBitmap = (unsigned char *)malloc(sizeof(unsigned char) * bytesPerRow * height);
        
if(newBitmap)
        { // Copy the data
for(int i = 0; i < bufferLength; ++i)
            {
newBitmap[i] = bitmapData[i];
}
}
        
free(bitmapData);
}
    
    else
    {
NSLog(@"Error getting bitmap pixel data\n");
    }
    
CGContextRelease(context);    
return newBitmap;
}

-(CGContextRef) newBitmapRGBA8ContextFromImage:(CGImageRef) image
{
CGContextRef context = NULL;
CGColorSpaceRef colorSpace;
uint32_t *bitmapData;
    
size_t bitsPerPixel = 32;
size_t bitsPerComponent = 8;
size_t bytesPerPixel = bitsPerPixel / bitsPerComponent;
    
size_t width = CGImageGetWidth(image);
size_t height = CGImageGetHeight(image);
    
size_t bytesPerRow = width * bytesPerPixel;
size_t bufferLength = bytesPerRow * height;
    
colorSpace = CGColorSpaceCreateDeviceRGB();
    
if(!colorSpace)
    {
NSLog(@"Error allocating color space RGB\n");
return NULL;
}
    
// Allocate memory for image data
bitmapData = (uint32_t *)malloc(bufferLength);
    
if(!bitmapData)
    {
NSLog(@"Error allocating memory for bitmap\n");
CGColorSpaceRelease(colorSpace);
return NULL;
}
    
//Create bitmap context
context = CGBitmapContextCreate(bitmapData, width,height,bitsPerComponent,bytesPerRow,colorSpace,
                                    kCGImageAlphaPremultipliedLast); // RGBA
    
if(!context)
    {
free(bitmapData);
NSLog(@"Bitmap context not created");
    }   
CGColorSpaceRelease(colorSpace);    
return context;
}


How to pop up the UIImagePickerController in an iphone to select an image?


There are several ways to let the user select an image from a iphone or an ipad. All what we have to do is to use the UIImagePickerController to start the image picking task from the Photo Library, Saved Photos Album and the Camera.
In this post I'm going to explain how to pick an image from the Photo Library. So, make sure that you have images in your photo Library.

Note that you have to tell the program header file (your .h file) that you are using the following delegates

UIApplicationDelegate
UIImagePickerControllerDelegate
UINavigationControllerDelegate

All what you have to do is adding a button on your screen and let the user click on it to start popping up the image picker, let them select an image. If an image is selected successfully, then automatically the delegate method didFinishPickingMediaWithInfo will be called where you can view your image in a UIImageView or do whatever the processing you want with the image.

-(IBAction)selectImage:(id)sender
{
     [self selectAnImage];
}

//method to let the user select an image from the UIImagePickerView
-(void)selectAnImage
{
    ipc=[[UIImagePickerController alloc] init];//instantiate a UIImagePickerViewController object
    ipc.delegate=self;

    //First I am checking that the camera is available
    if([UIImagePickerController isSourceTypeAvailable:UIImagePickerControllerSourceTypeCamera])
    {
        NSLog(@"Camera is available");
        ipc.sourceType=UIImagePickerControllerSourceTypeCamera; 
    }
    
    //if not check whether the saved photo album is available
    else if([UIImagePickerController isSourceTypeAvailable:UIImagePickerControllerSourceTypeSavedPhotosAlbum])
    {
        NSLog(@"Camera is not available");
        NSLog(@"Photo Album is available");
        
        ipc.sourceType=UIImagePickerControllerSourceTypeSavedPhotosAlbum;  
    }
    
    //if none of the above two are avaialble, then use the Photo Library
    else
    {
        NSLog(@"Camera is not available");
        NSLog(@"Photo Album is not available");
        NSLog(@"Photo Library is available");
        
        ipc.sourceType=UIImagePickerControllerSourceTypePhotoLibrary;
    }
    
     [self presentModalViewController:ipc animated:YES];
}

//ImagePickerControler delegate
//triggers when the user has selected an image
- (void)imagePickerController:(UIImagePickerController *)picker didFinishPickingMediaWithInfo:(NSDictionary *)info
{
    
    NSArray *paths = NSSearchPathForDirectoriesInDomains( NSDocumentDirectory, NSUserDomainMask, YES);
    NSString *filePath = [[paths objectAtIndex:0]stringByAppendingPathComponent:@"Test.txt"];
    NSString *temp=[[NSString alloc]initWithString:@"Sample String"];
    [temp writeToFile:filePath atomically:YES encoding:NSUTF8StringEncoding error:nil];
      
    //set the selected image
    self.sourceImage=[info objectForKey:UIImagePickerControllerOriginalImage];
    imageDisplay.image=self.sourceImage;    
    [self checkImageResolution:self.sourceImage];
    [[picker parentViewController]dismissModalViewControllerAnimated:YES];
    [picker dismissModalViewControllerAnimated:YES];
}

//ImagePickerControler delegate
//triggers when user did cancel the image selection from the UIimagePickerView
- (void)imagePickerControllerDidCancel:(UIImagePickerController *)picker
{
  [[picker parentViewController]dismissModalViewControllerAnimated:YES];
}


Thursday, August 15, 2013

How to convert a UIImage to Grayscale?


Please do follow this post along with the post here

Note that I have already shown you the coding on how to pick an image from the UIImagePickerViewController and display it in the UIImageView we have in the screen. So, I assume you have already assigned the selected image's value using imageDisplay.image to the sourceImage variable. 

OK, let's discuss the code to convert an image to Grayscale and display the output.

//this button click even twill call the toGrayscale() method 
-(IBAction) convertGrayScale:(id)sender
{    
    if(sourceImage==nil)//sourceImage  is the user selected image from the Image Picker. I simply display it on a UIImageView and for the processing  i get the image that is currently viewed in the UIImageView
    {
        NSLog(@"Image Not selected");
    }
    
    else
    {   
        UIImage *greyScaledImage=[self toGrayscale:sourceImage];
        resultImageView.image=greyScaledImage;
    } 
}

//method is used to convert an image to its grayscale image and view in the UIImageView on te screen
- (UIImage *) toGrayscale:(UIImage *)initialImage
{
    const int RED = 1;
    const int GREEN = 2;
    const int BLUE = 3;
    
    // Create image rectangle with current image width/height
    CGRect imageRect = CGRectMake(0, 0, initialImage.size.width * initialImage.scale, initialImage.size.height * initialImage.scale);
    
    int width = imageRect.size.width;
    int height = imageRect.size.height;
    
    // the pixels will be painted to this array
    uint32_t *pixels = (uint32_t *) malloc(width * height * sizeof(uint32_t));
    
    // clear the pixels so any transparency is preserved
    memset(pixels, 0, width * height * sizeof(uint32_t));
    
    CGColorSpaceRef colorSpace = CGColorSpaceCreateDeviceRGB();
    
    // create a context with RGBA pixels
    CGContextRef context = CGBitmapContextCreate(pixels, width, height, 8, width * sizeof(uint32_t), colorSpace, 
                                                 kCGBitmapByteOrder32Little | kCGImageAlphaPremultipliedLast);
    
    // paint the bitmap to our context which will fill in the pixels array
    CGContextDrawImage(context, CGRectMake(0, 0, width, height), [initialImage CGImage]);
    
    for(int y = 0; y < height; y++)
    {
        for(int x = 0; x < width; x++)
        {
            uint8_t *rgbaPixel = (uint8_t *) &pixels[y * width + x];
            
            //convert to grayscale using recommended method: http://en.wikipedia.org/wiki/Grayscale#Converting_color_to_grayscale
            
            uint32_t gray = 0.3 * rgbaPixel[RED] + 0.59 * rgbaPixel[GREEN] + 0.11 * rgbaPixel[BLUE];
            
            // set the pixels to gray
            rgbaPixel[RED] = gray;
            rgbaPixel[GREEN] = gray;
            rgbaPixel[BLUE] = gray;
        }
    }
    
    // create a new CGImageRef from our context with the modified pixels
    CGImageRef image = CGBitmapContextCreateImage(context);
    
    // we're done with the context, color space, and pixels
    CGContextRelease(context);
    CGColorSpaceRelease(colorSpace);
    free(pixels);
    
    // make a new UIImage to return
    UIImage *resultUIImage = [UIImage imageWithCGImage:image
                                                 scale:initialImage.scale 
                                           orientation:UIImageOrientationUp];
    
    return resultUIImage;
}


How to re size a UIImage with given height and width?


Please do follow this post along with the post here

here, we allow the user to enter a preferred height and width for the image to be re sized. Once done and click on the re size button, the re sized image will be displayed in the UIImageView below. Following is the implementation

//method to resize the image
//user needs to input the required height and width in the screen
//and cick Resize to apply the resize funtion
-(IBAction) resize:(id)sender
{
    [self.view endEditing:YES];
    
    if(sourceImage==nil)
    {
        NSLog(@"Image Not selected");
    }
        
    else
    { 
        if([getWidth.text isEqualToString:@""] ||  [getHeight.text isEqualToString:@""])
        {
            alert=[[UIAlertView alloc]initWithTitle:@"Image Process" message:@"Height & Width Required" delegate:nil cancelButtonTitle:@"Cancel" otherButtonTitles:@"OK", nil];   
            
            [alert show];
        }
        
        else
        {            
            CGFloat destinationWidth = [getWidth.text floatValue];
            CGFloat destinationHeight =[getHeight.text floatValue];
            
            CGFloat xOfResultImage = (CGFloat)resultImageView.frame.origin.x;
            CGFloat yOfResultImage = (CGFloat)resultImageView.frame.origin.y;
        
            CGSize passSize=CGSizeMake(destinationWidth, destinationHeight);    
          
            UIImage *resizedImage=[self scaleImage:sourceImage toSize:passSize];
            
            resultImageView.image=resizedImage;
            resultImageView.frame = CGRectMake(xOfResultImage, yOfResultImage,resizedImage.size.width, resizedImage.size.height);
            
        }
    }
}

//to scale images without changing aspect ratio
- (UIImage *)scaleImage:(UIImage *)image toSize:(CGSize)newSize
{
    float width = newSize.width;
    float height = newSize.height;
    
    UIGraphicsBeginImageContext(newSize);
    CGRect rect = CGRectMake(0, 0, width, height);
    
    float widthRatio = image.size.width / width;
    float heightRatio = image.size.height / height;
    float divisor = widthRatio > heightRatio ? widthRatio : heightRatio;
    
    width = image.size.width / divisor;
    height = image.size.height / divisor;
    
    rect.size.width  = width;
    rect.size.height = height;
    
    //indent in case of width or height difference
    float offset = (width - height) / 2;
    
    if (offset > 0)
    {
        rect.origin.y = offset;
    }
    else
    {
        rect.origin.x = -offset;
    }
    
    [image drawInRect: rect];
    
    UIImage *resizedImage = UIGraphicsGetImageFromCurrentImageContext();
    UIGraphicsEndImageContext();
    
    return resizedImage ;   
}